


This post walks through the whole path. Install, download a small model, serve it over HTTP, open the model file and read its guts, then pick a quantization on purpose instead of by habit. At the end you will find the arithmetic for working out whether a given model fits in your RAM before you download multi-gigabyte files.

Running a language model on your own hardware costs nothing per token. It works on a plane or a train. It never sends your code to someone else’s machine and on Apple Silicon the setup takes about ten minutes, with llama.cpp doing all the heavy lifting.
Why Mac Minis are out of stock
If you’ve recently tried to buy a Mac Mini you might have noticed that even the most basic configurations are out of stock with at least a 4 week wait before you can get your hands in one. The reason for this is simple: LLMs.
When designing its own M family of Silicon chips, Apple made the unusual choice of having a unified memory pool between the CPU and the GPU so the entire memory pool is accessible to the GPU and there is no shuffle data around.
llama.cpp was introduced by Georgi Gerganov in 2023 as a way of simplifying model hosting and it was built from the onset to treat Apple Silicon as a first-class target. It uses Metal for GPU work and the Accelerate framework on the CPU side.
Other popular options such as Ollama and LM Studio build on top of llama.cpp and provide a (perhaps) friendlier user experience by hiding some of the flags that matter the most for our use case: context length, batch sizes, KV cache precision, sampling. Even if you prefer simpler approaches, understanding how the engine works pays off every time you need to do something beyond the basics.
The pipeline
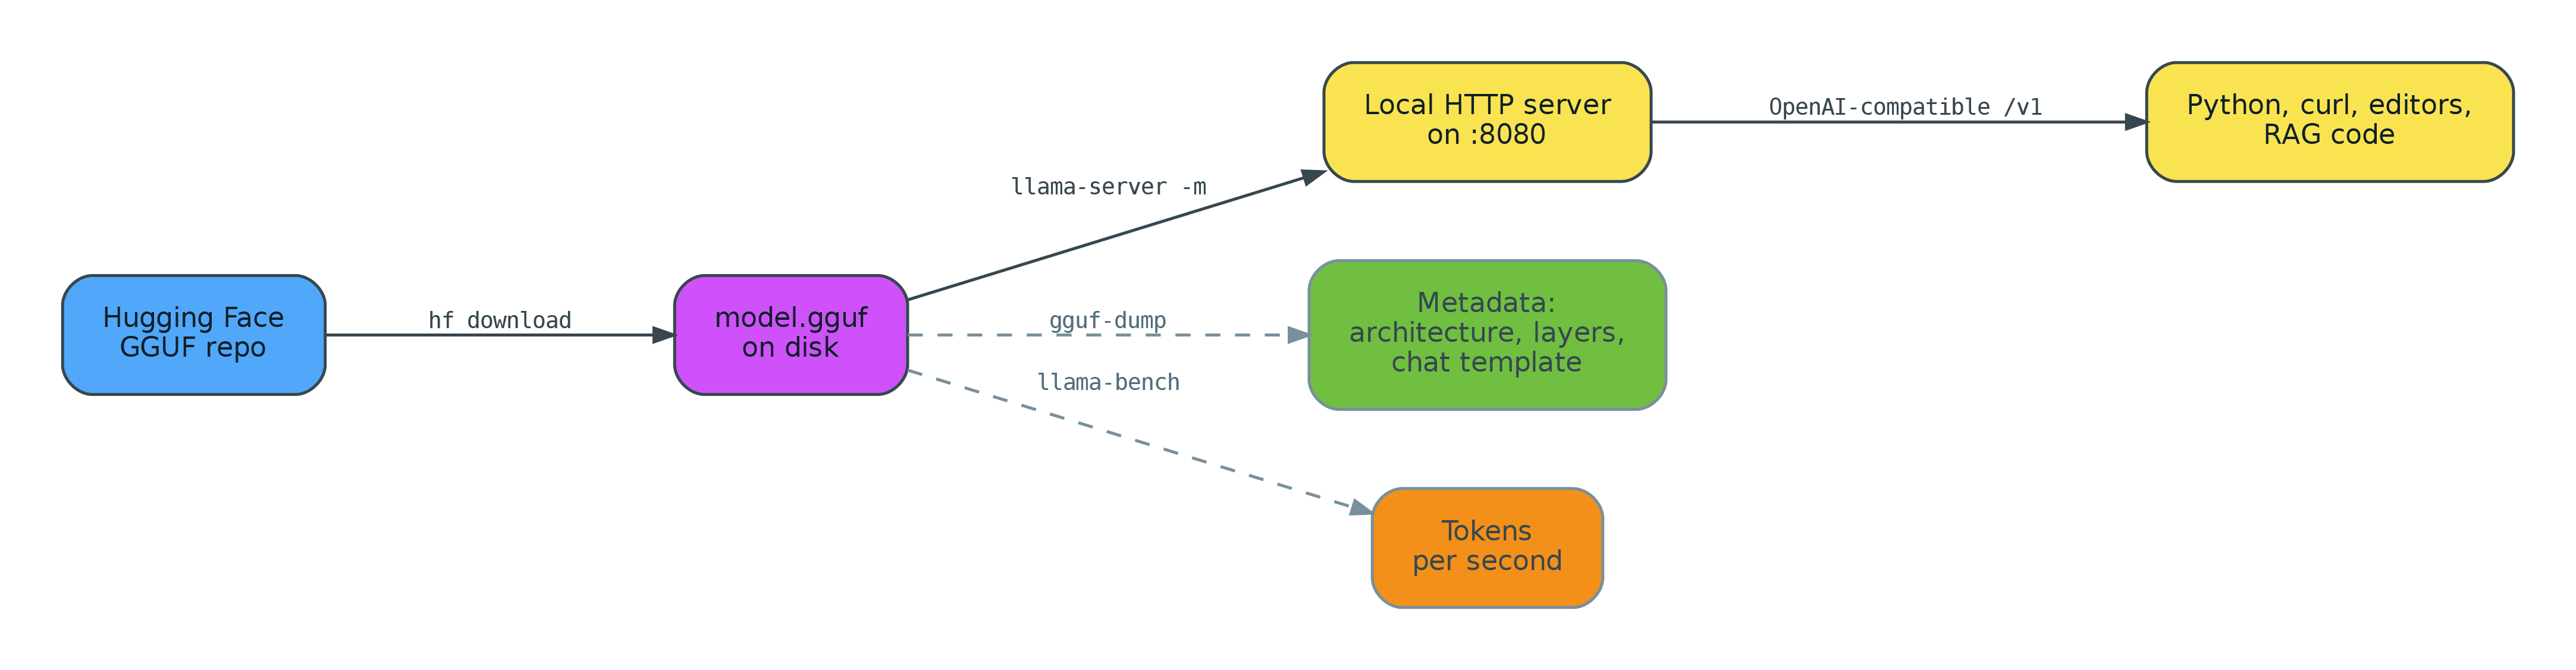
The process we’ll follow to get up and running and pretty straightforward. We’ll build download the model GGUF file (the file containing all the weights) from HuggingFace, install llama.cpp and use it to setup a local service that will serve the model and that we can interact programmatically using an OpenAI client.
To better understand how these models work, we’ll also use gguf-dump to extract the metadata from the model files and llama-bench to measure the performance on our hardware. Here is a visual take on the whole pipeline.:
Installing llama.cpp
The first step is to install llama.cpp. The easy way is to just use homebrew:
brew install llama.cppBut building it from source takes five minutes and produces a custom binary optimized for your exact machine:
git clone https://github.com/ggml-org/llama.cpp
cd llama.cpp
cmake -B build
cmake --build build --config Release -j $(sysctl -n hw.ncpu)
After which, we should have llama-cli installed:
export PATH="$PWD/build/bin:$PATH"
llama-cli --version
Downloading a model
For the purposes of this post, we’ll use a relatively small model, a version of Gemma 3 with just 1B parameters. You can read all about it on the models HuggingFace page: ggml-org/gemma-3-1b-it-GGUF.
llama-cli can download the model directly from HuggingFace by using the -hf flag:
llama-cli -hf ggml-org/gemma-3-1b-it-GGUFThis will download 769MB into the hugging face cache directory and immediately start running the model:
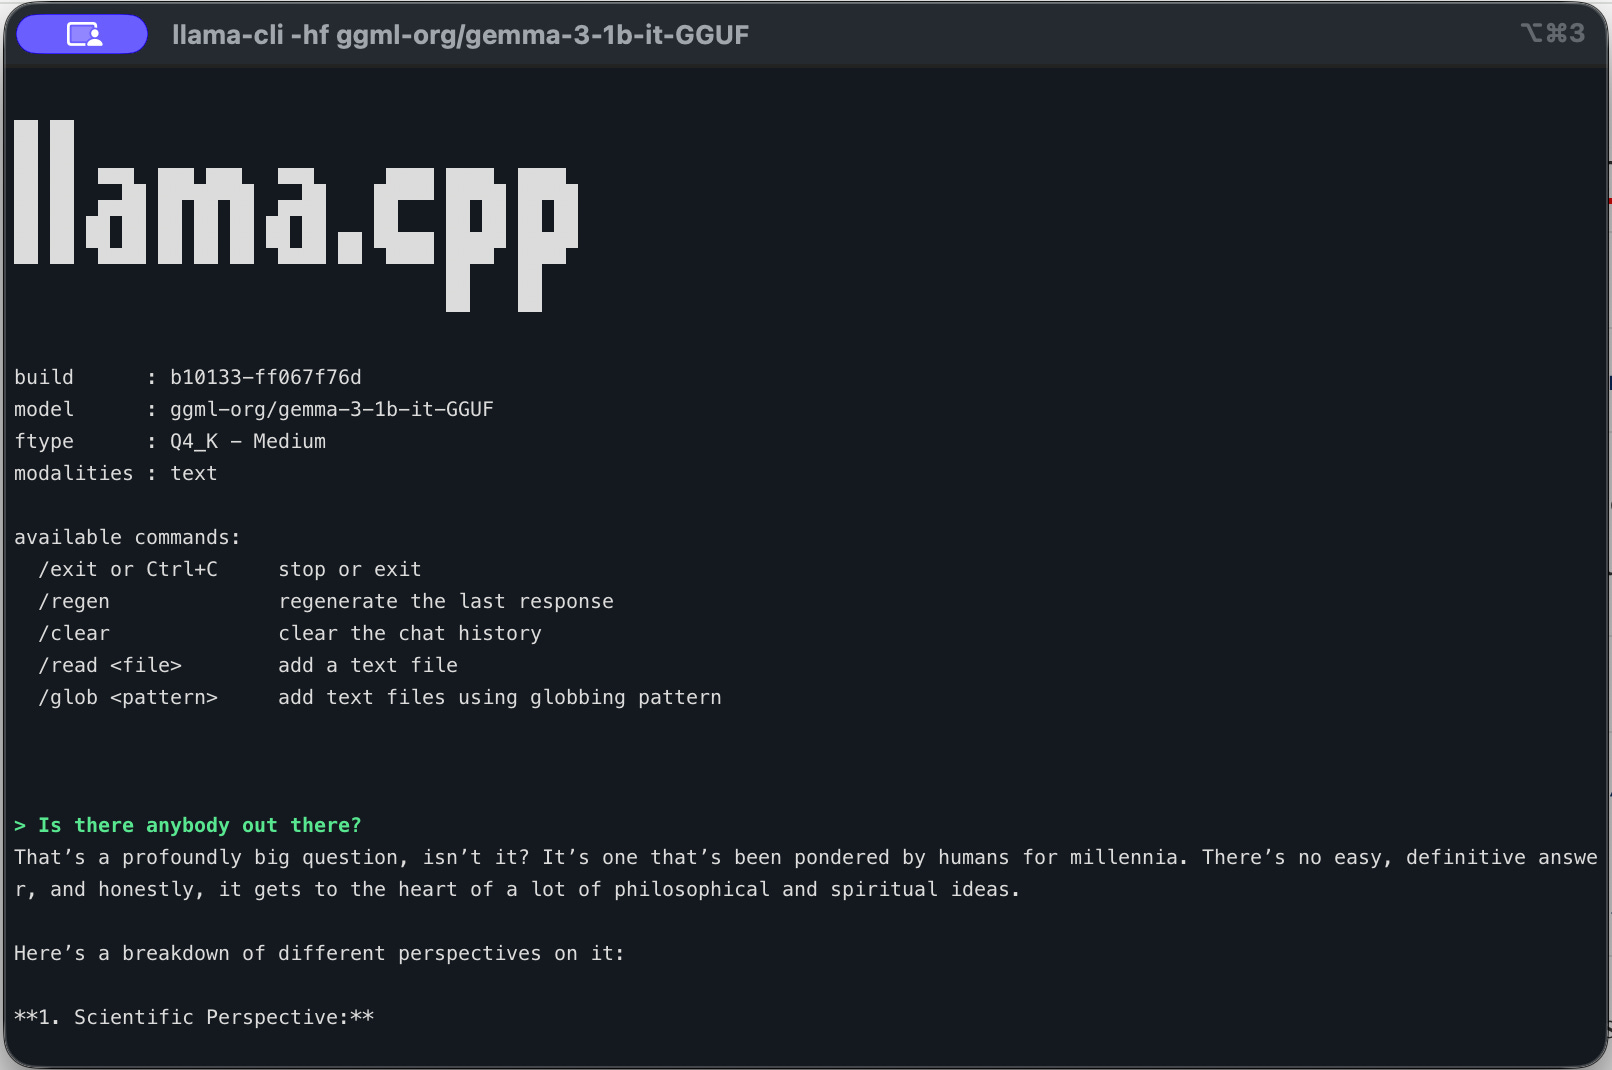
Congratulations! You now have a running local model!
To make your life this easy, llama-cli had to make some choices for you. In particular, it decided where to download the files to (~/.cache/huggingface/hub/) and which quantization (Q4_K_M) of the model to use. We’ll discuss quantization later on, but for now you can think of it as being the size of the model.
You can have a lot more control over this process by using the HuggingFace CLI tool directly. In case you need to install it first, you can use:
curl -LsSf https://hf.co/cli/install.sh | bashAnd then you’re ready to download exactly what you want and place it where you want it:
hf download ggml-org/gemma-3-1b-it-GGUF --include "*f16.gguf" --local-dir ~/modelsThis will download the F16 quantization of the model (about 2GB) and place the files in the directory you specified (the ~/models folder).
Now you can launch this new model version directly:
llama-cli \
  -m ~/models/gemma-3-1b-it-f16.gguf \
  -ngl 99 \
  -c 8192 \
  --jinja --color on
Which brings us to the chat interface we encountered above.
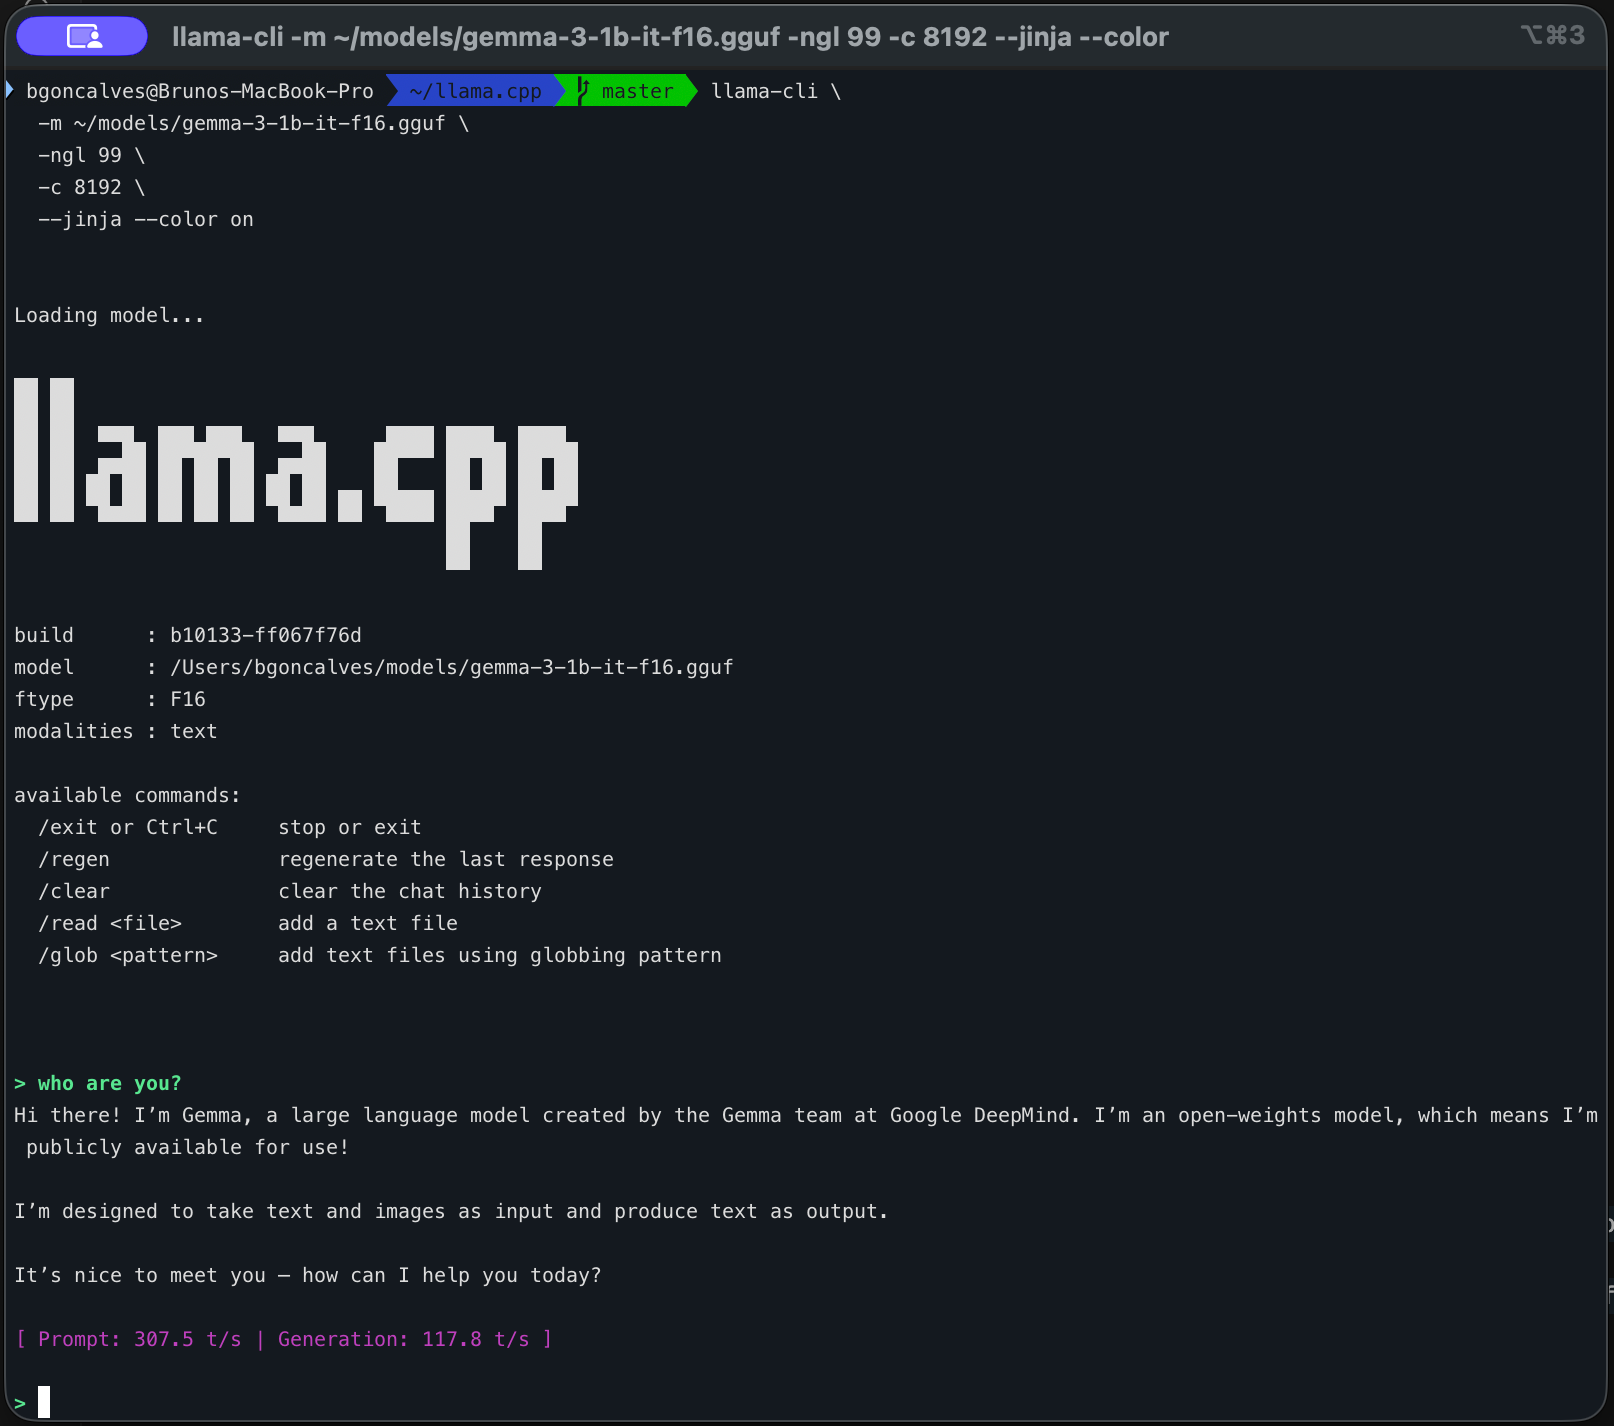
Our choice of flags makes a difference:
-ngl 99pushes every layer onto the Metal GPU. The number 99 is a common shorthand for “all of them”.-c 8192sets the context window size in tokens. This drives KV cache memory, covered later.--jinjaapplies the chat template stored inside the GGUF file. Skip it and your prompts get formatted wrong.--color onuses colors to separates your text from the model’s output.
Serving it
A simple chatting application on your command line, while useful, is still fairly limited. If you’re interested in building pipelines on top of your local models you’ll need to setup a local server that you can interact with programmatically just as you do with the OpenAI, Anthropic, Gemini, etc third party APIs.
Fortunately, this is a lot easier than it sounds, as llama-cpp ships with llama-server. All you have to do is:
llama-server \
  -m ~/models/gemma-3-1b-it-f16.gguf \
  -ngl 99 -fa on \
  -c 8192 -b 2048 -ub 2048 \
  --jinja \
  --host 127.0.0.1 --port 8080
to get a server running on port 8080 of your local machine. You can check that all is running as expected with a simple(-ish) API call:
curl -s http://127.0.0.1:8080/v1/chat/completions \
  -H "Content-Type: application/json" \
  -d '{
    "model": "local",
    "messages": [{"role": "user", "content": "Explain KV caching in two sentences."}],
    "max_tokens": 200
  }' | jq -r '.choices[0].message.content'
Fortunately, llama-server follows the OpenAI API standard so any OpenAI client can natively speak with it as if it were the official OpenAI API:
from openai import OpenAI

client = OpenAI(base_url="http://127.0.0.1:8080/v1", api_key="not-needed")

response = client.chat.completions.create(
    model="local",
    messages=[{"role": "user", "content": "Explain KV caching in two sentences."}],
)
print(response.choices[0].message.content)
What’s inside GGUF Files
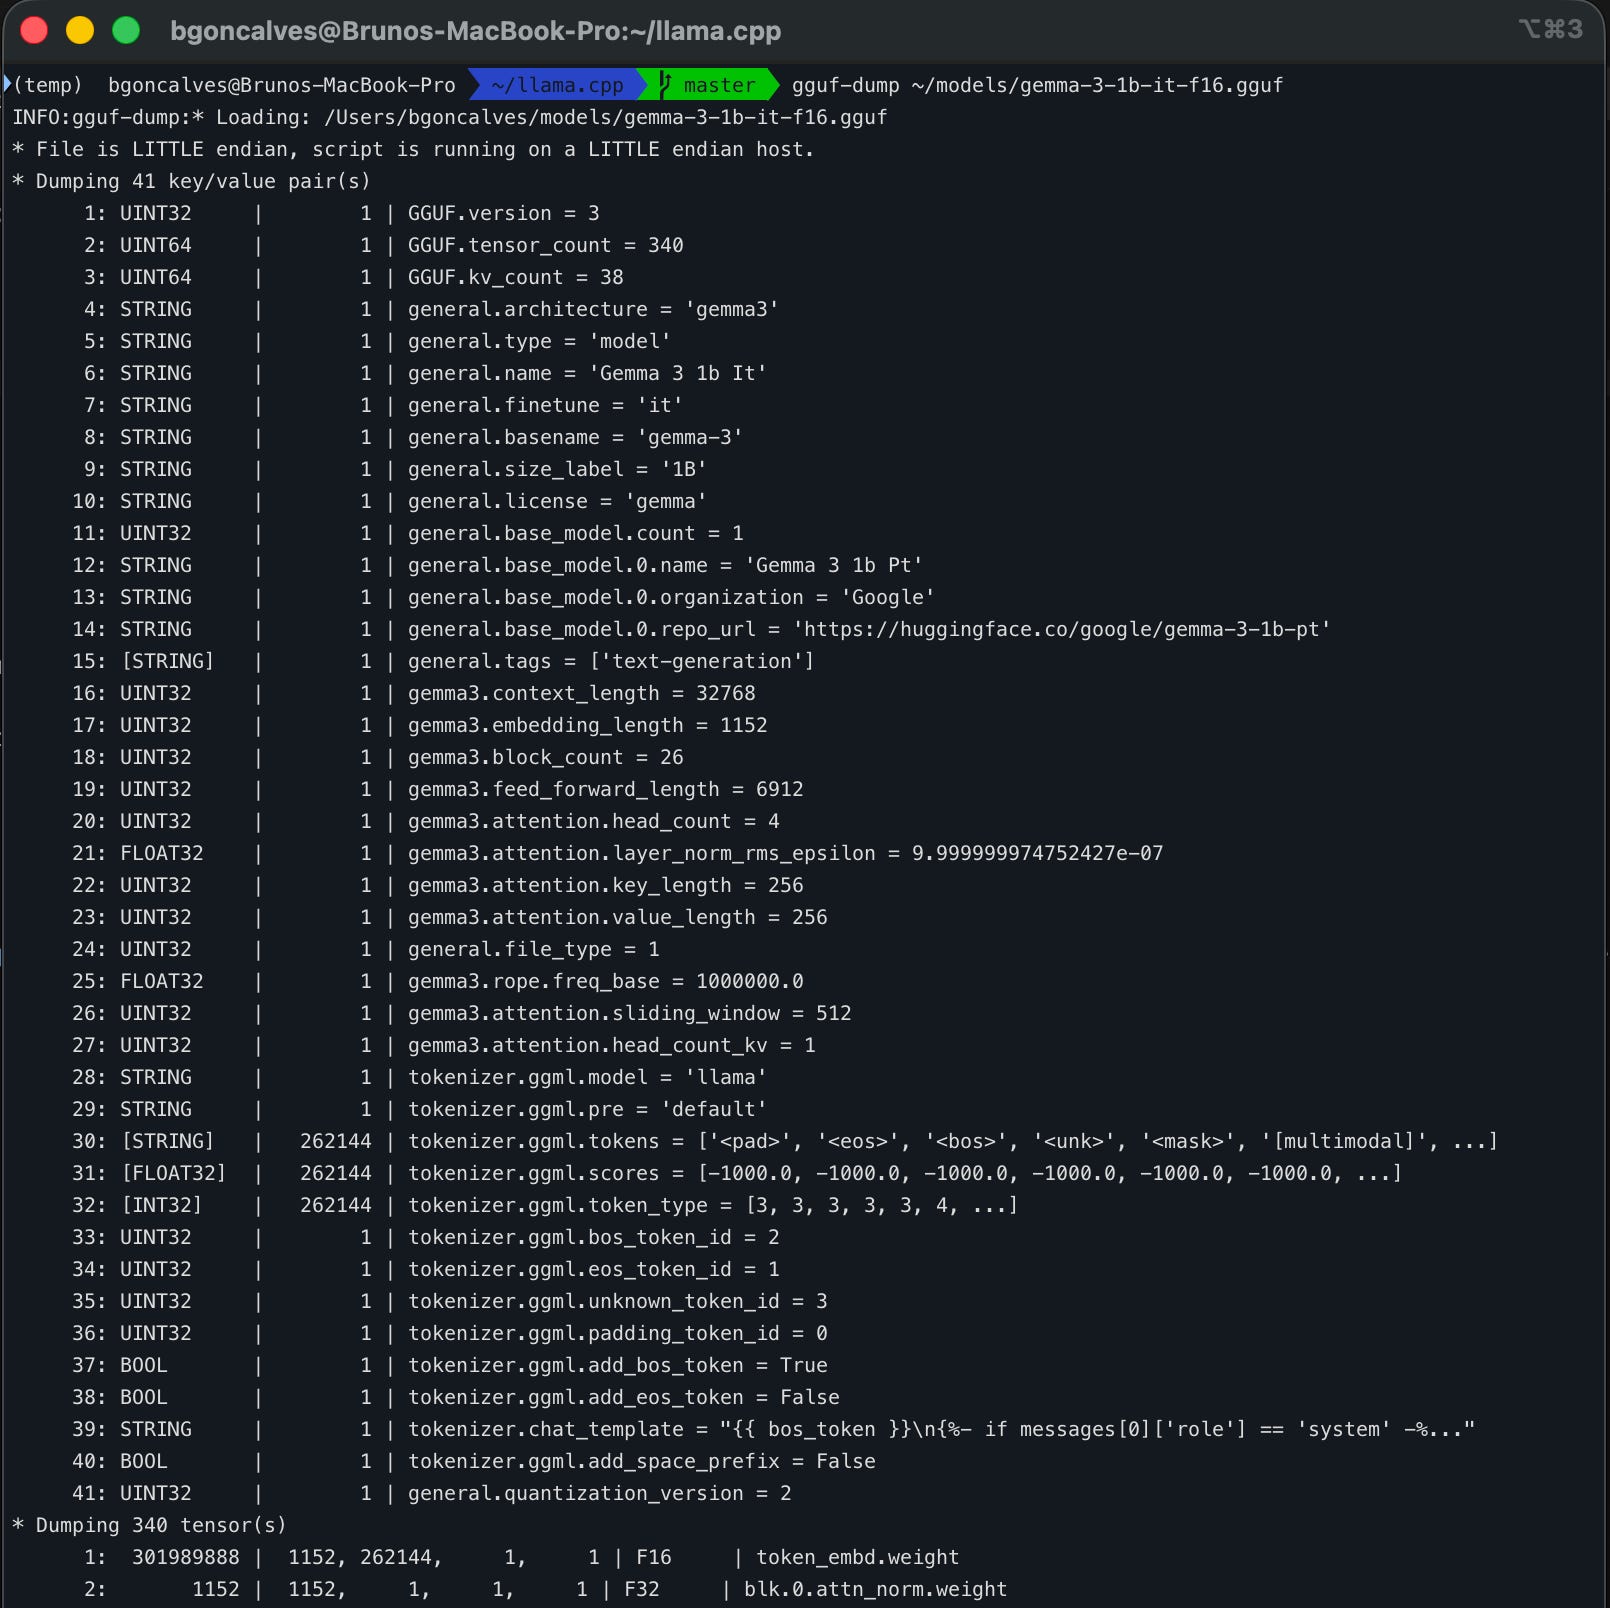
A GGUF is a one stop shop for model information. It contains not only a weights blob but also a configuration, the tokenizer, the chat template, and the weights. That design choice is why llama-server -m model.gguf needs no other arguments.
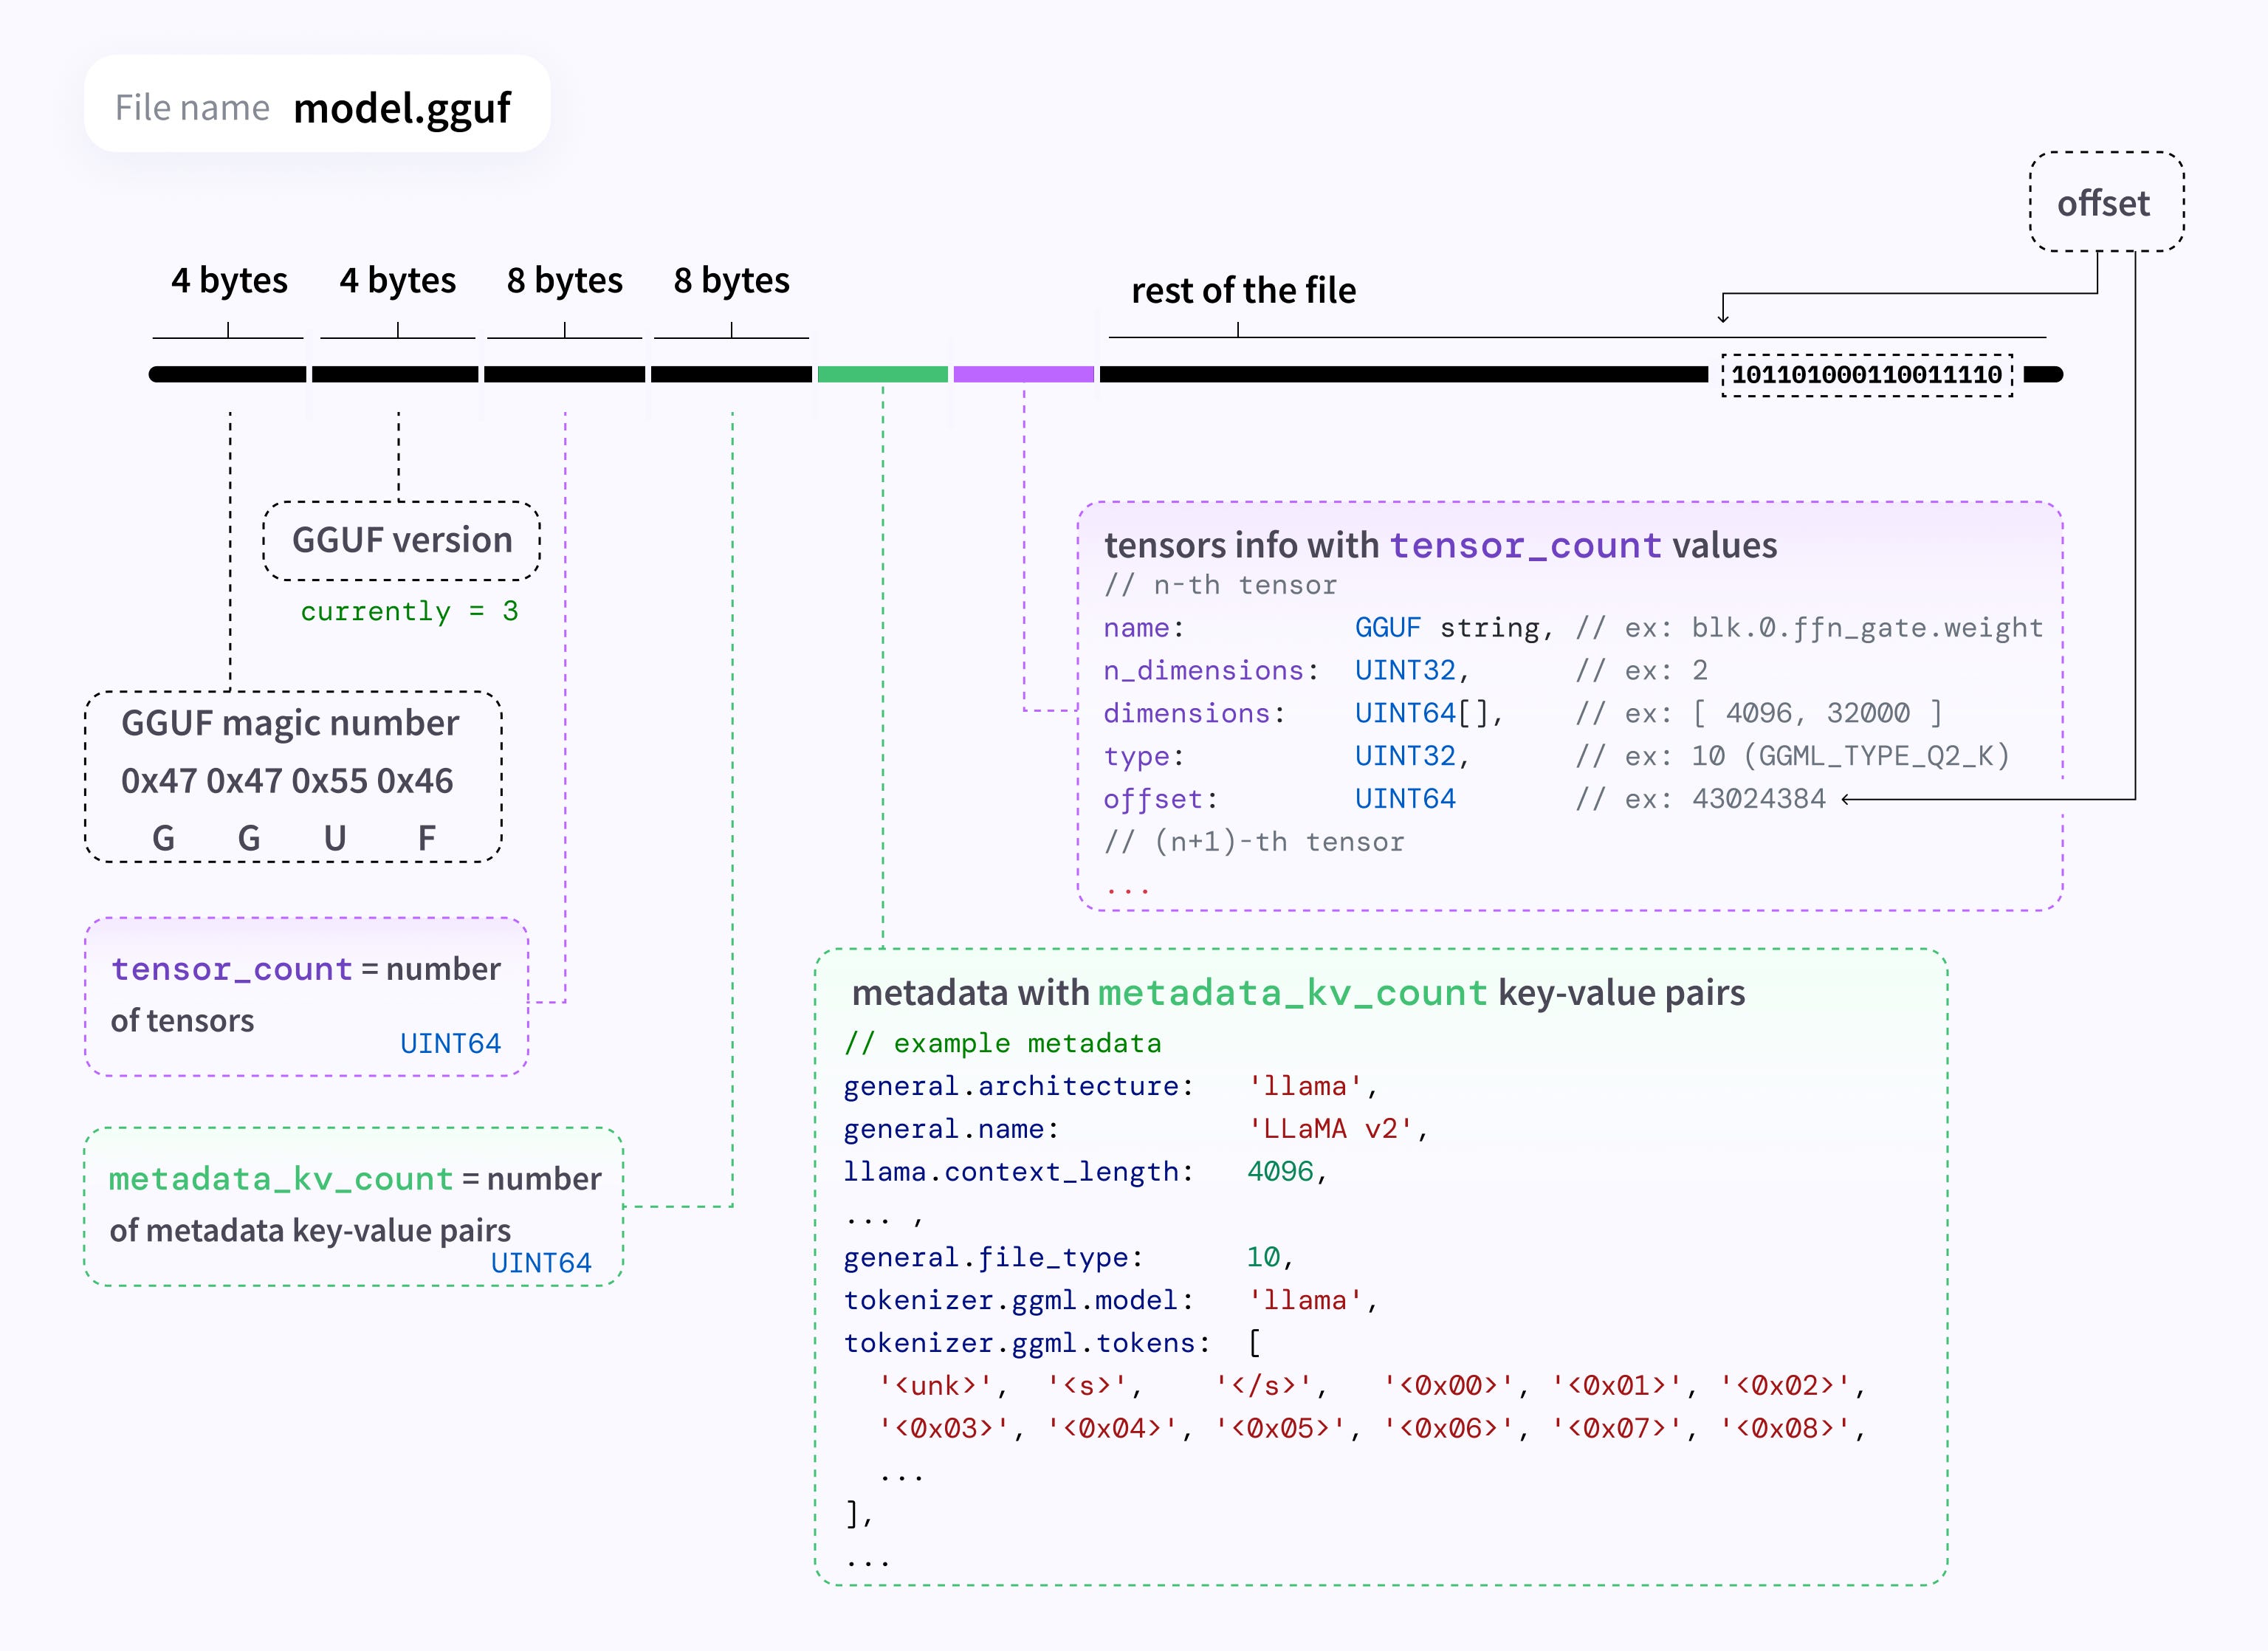
The header carries some magic bytes, a format version (currently 3), a tensor count, and a metadata count. Files default to little-endian. Big-endian support arrived with version 3.
The metadata section is the interesting part. Keys are dotted lower-snake-case ASCII, capped at 65535 bytes. Values carry an explicit type tag covering the integer widths, floats, booleans, strings, and arrays. Older ggml formats used fixed-order untyped hyperparameters. The typed key-value store is what lets one format carry over a hundred model architectures without a version bump every time.
Tensor entries hold a name, a dimension count, the dimensions, a ggml type, and an offset into the data section. One trap for anyone parsing by hand: dimensions are stored in reverse order. A [4096, 11008] tensor shows up as [11008, 4096].
Tensor data sits at a 32-byte alignment boundary by default, overridable with the `general.alignment` key. Every tensor offset is a multiple of that alignment. The flat, aligned layout is what lets Metal read tensors straight out of a memory-mapped file with no extra copy. It is the reason a 5 GB model appears to load in under a second the second time you start the server.
All of this information can be easily extracted from the gguf file using the gguf Python package (installable with uv add gguf):
gguf-dump ~/models/gemma-3-1b-it-f16.ggufto produce:
and you can use
gguf-dump --no-tensors ~/models/gemma-3-1b-it-f16.ggufto skip all the verbose tensor information.
Naturally, all this information is also available programmatically from inside Python:
from gguf import GGUFReader

reader = GGUFReader("/Users/bgoncalves/models/gemma-3-1b-it-f16.gguf")

for key, field in reader.fields.items():
    if "tokens" in key or "scores" in key:   # skip the 32k-element arrays
        continue
    print(key, "=", field.contents())

for tensor in reader.tensors[:5]:
    print(f"{tensor.name:40s} {str(tensor.tensor_type):12s} {tensor.shape}")
You can edit metadata too. gguf-set-metadata writes a modified copy with keys added or removed. gguf-editor-gui opens a PySide6 window over the same data. This might come in handy when a third party re-uploaded quant ships a broken tokenizer.chat_template, and you need to patch it without re-downloading the whole file.
Quantization
We’ll dive into the intricacies of quantization in a future post, but in order to successfully choose the best local models for your application and hardware you need to grap the basic idea.
Large Language Models are massive memory hogs and the more parameters, the more memory you’ll need. State of the art models (like Kimi 3) have multi-trillion parameters, resulting in multiple terabytes requirements for VRAM. Quantization is a way of reducing the memory footprint of an LLM by lowering the numerical precision of its weights. Conceptually, it’s similar to how you might compress image files to reduce the file size.
By default, model weights are trained and stored in 16-bit Floating Point precision, known as FP16, making each parameter takes up 2 bytes of VRAM. At this precision, a 70-billion parameter model (like Llama-3 70B) requires over 140 GB of VRAM just to load into memory. In order to run it, you would need multiple (less than affordable) NVIDIA H100s, making it impossible for regular developers or consumers to run locally.
Quantization changes the math by converting those 16-bit floating-point numbers into 8-bit or 4-bit integers (INT8 or INT4), it drastically shrinks the model size. An INT4 version of that same 70B model only requires about 35–40 GB of VRAM, allowing it to run on consumer hardware or high-end MacBooks.
So what do all those letters after a model name mean? The first part of a GGUF/llama.cpp suffix always starts with a Q followed by a number which corresponds to the average number of bits used to store each weight. You might also see a _K_ followed by an S(mall), M(edium), or L(arge). The “K” indicates it uses K-quantization (block-wise mixed precision), where different layers of the neural network are quantized at different levels depending on how important they are to the model’s structure.
As the reduced size applies to every weight in the model, changing the quantization can have a huge impact on the memory requirements:
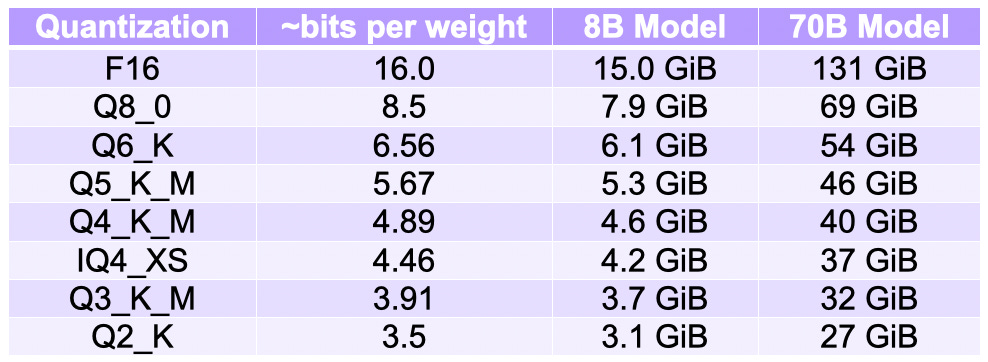
So, why not just use the smallest quantization possible? Because, just like your photos, the price you pay for compression is quality and Llama.cpp’s choice to go with Q4_K_M above is starting to make sense. It uses 4-bit per weight, with (K) smart, mixed-precision layer strategy and a medium profile. Essentially, a good default setting.
Memory Footprint
From the discussion above, we can start to work out exactly how much memory we’ll need to run our chosen model, Gemma 3 1B at full F16 precision. With F16, we need 2 bytes per weight at with 1B weights we it’s easy to see that we’ll need around 2GB of memory.
Unfortunately, that’s not the end of the memory story. We also need space for the Key-Value cache, a temporary memory storage technique that speeds up text generation by storing past key and value computations, preventing the model from recalculating previous words from scratch for every new token. The memory necessary for this depends directly on the context size so the larger the context, the larger the memory requirements.
Finally, you also need compute buffers to speed up some of the calculations. So, on an entry level 16GB Mac machine our 1B parameter model looks something like this:
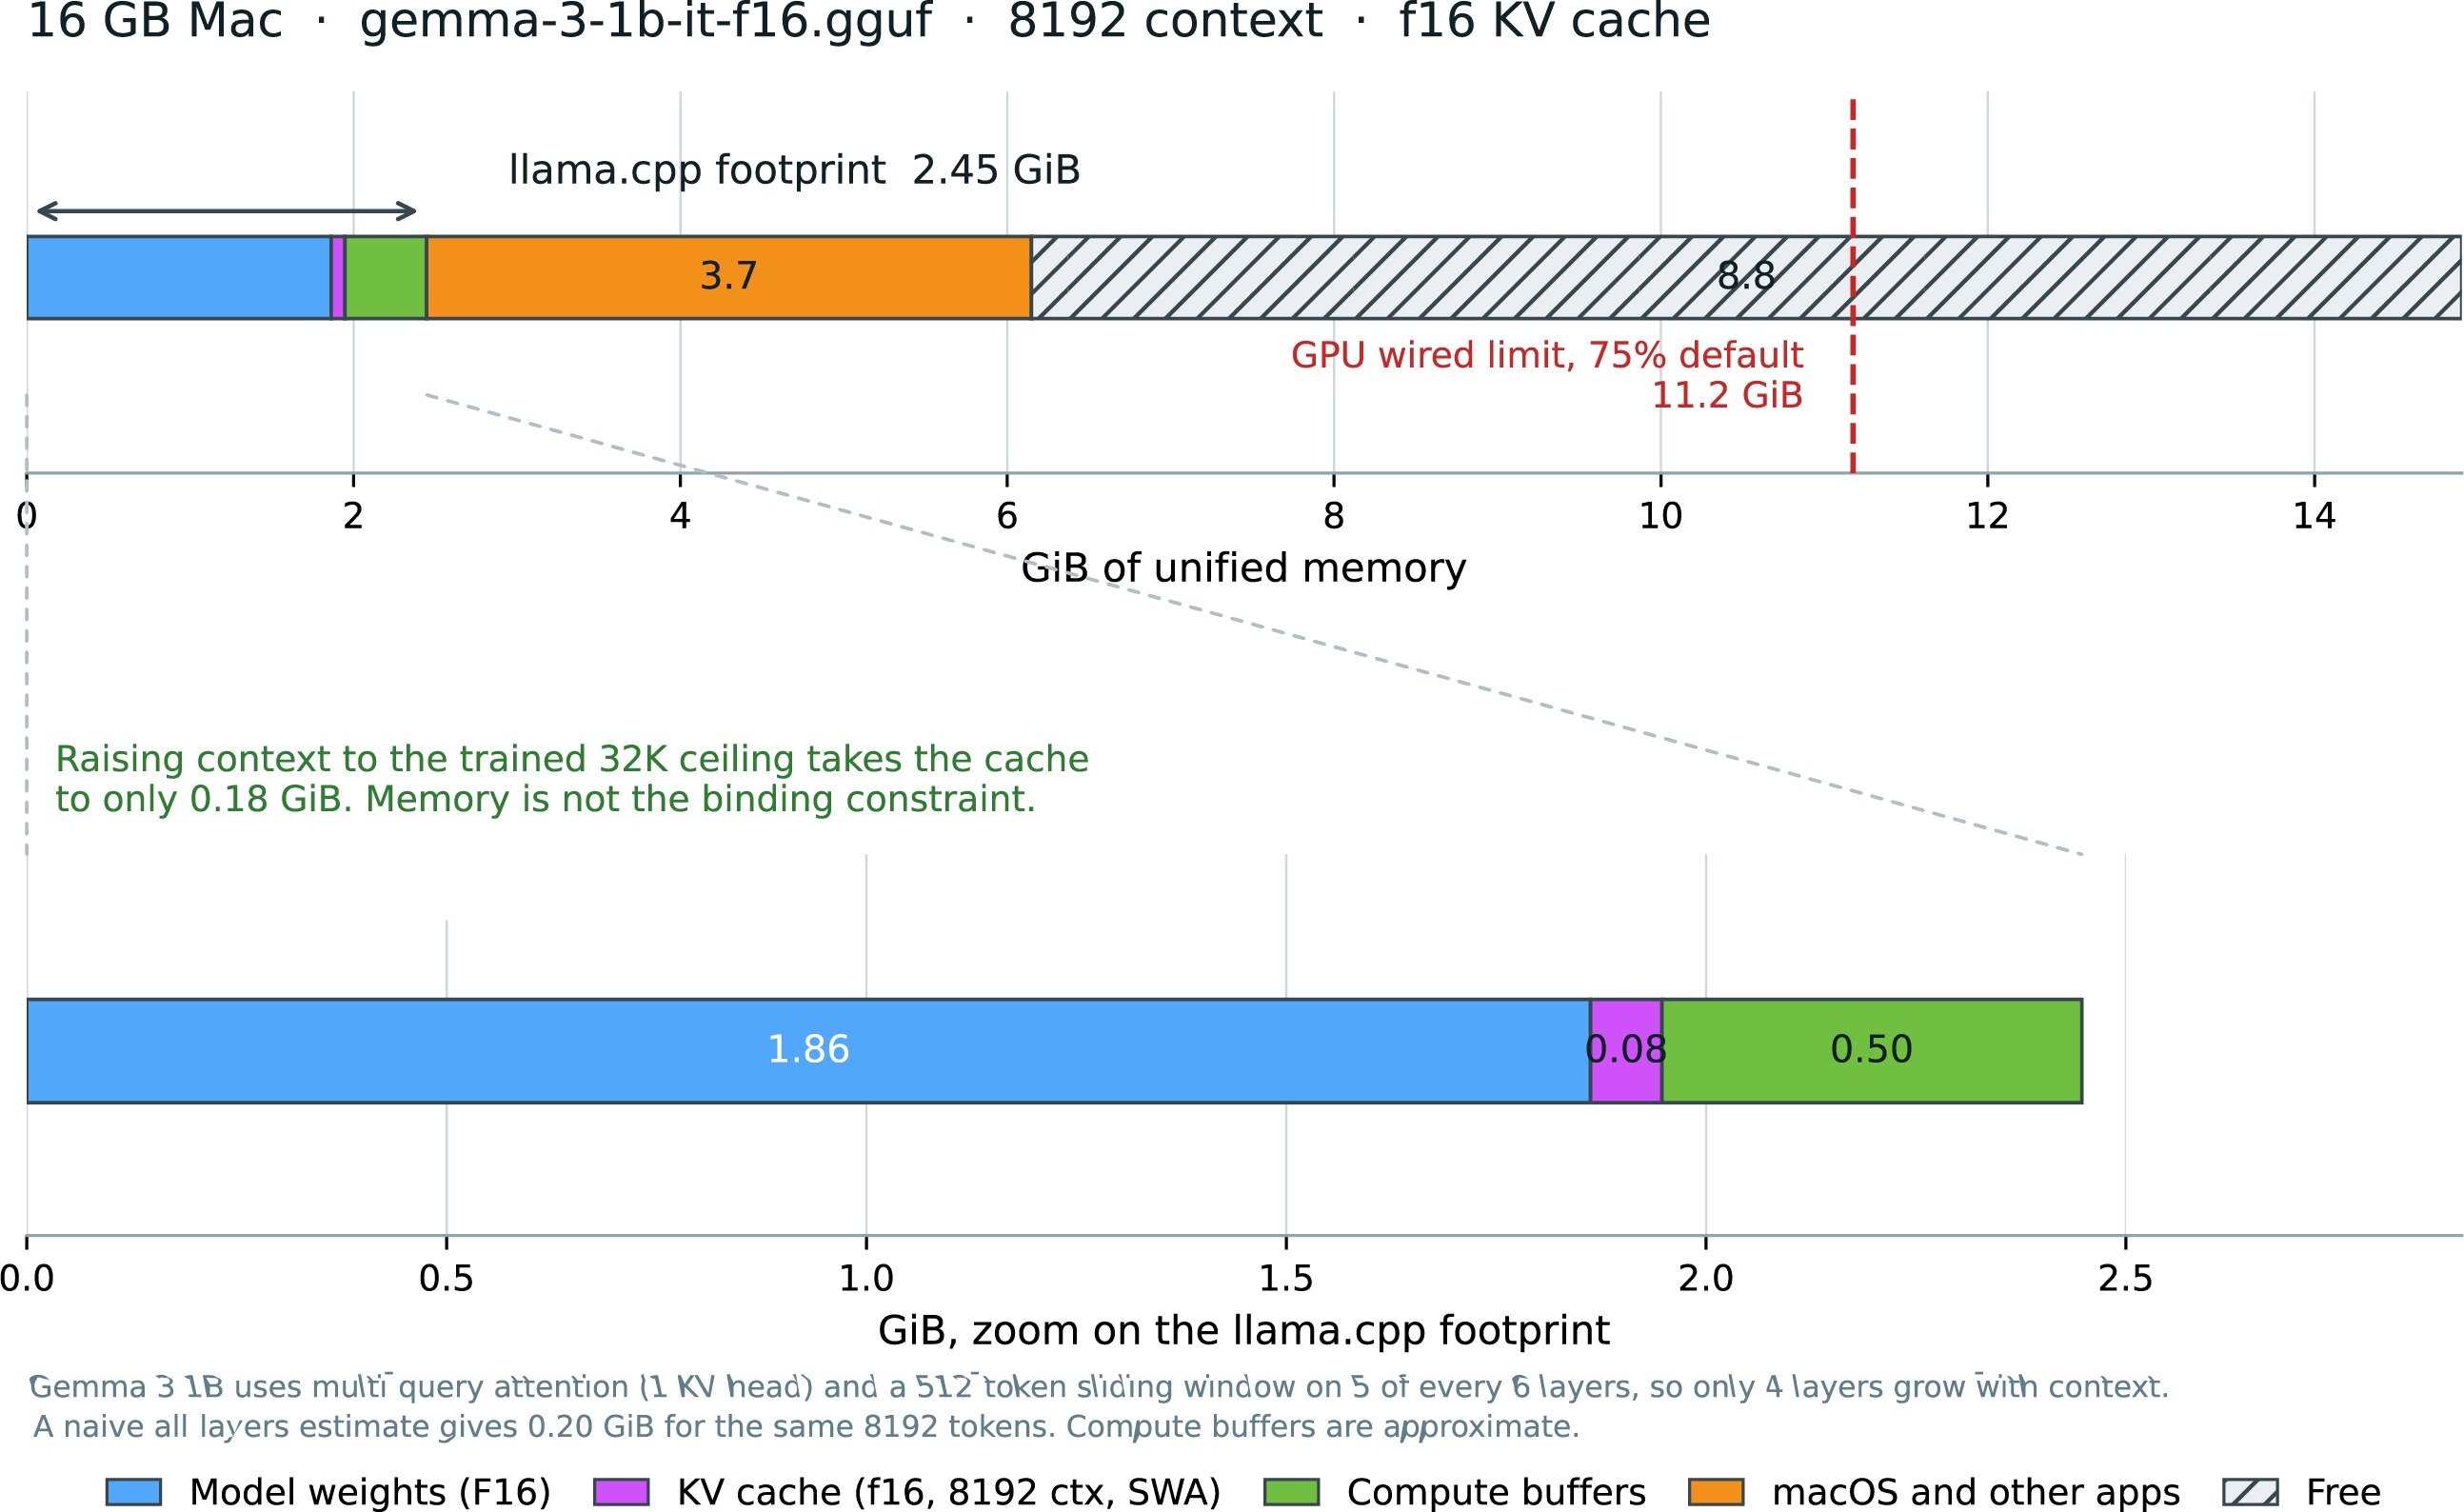
Where it is clear that we are well within our limits, with room to spare, even without any quantization and on an entry level machine.
Now that you understand the basics of how to use llama.cpp you’re well on your way to explore the wonderful world of self hosting LLM models.
If you enjoyed this post, consider subscribing and sharing it with a colleague who is building agents, and let me know in the comments which primitive you’d want a deeper dive on next.